Creating SSH Key Pairs to Facilitate Secure Access to the HPC System
Introduction
This section illustrates the conceptual underpinnings of public key cryptography and the use of key based authentication. Although useful, this background information is optional, and you may therefore skip it and go directly to the instructions for generating keys (sections 2 or 3) if you so wish.
Using a username and password combination to log in to a computer system is a well established, widely deployed authentication mechanism. It does, however, suffer from weaknesses that could compromise security and lead to unauthorized access. Arguably, using a pair of encryption "keys" to authenticate an individual to a system is more secure. Although at present our HPC system allows both authentication methods, with password authentication being the default, we encourage the use of so called SSH keys as a preferred method. Here, we provide a conceptual understanding of how SSH keys work, and also share instructions on how to generate and use SSH key pairs for authentication to our HPC system.
The following explanation is credited to Panayotis Vryonis. Minor stylistic modifications have been made in the first sub-section, and more moderate changes were made to the explanation in the second sub-section below. Users will undoubtedly benefit from this basic conceptual understanding of public key cryptography, but it is not essential in order for them to use ssh key pairs to set up their secure connection to the HPC system.
Please note that the explanations and analogies given below are intended to clarify the nature of public key cryptography for the lay audience, and do not concern themselves with mathematical theory or algorithmic complexity.
What is public key cryptography?
In very simplistic, non-technical language, cryptography scrambles information such that it cannot be unscrambled without a key (we'll discuss what keys are later). Public key cryptography is a form of cryptography the experts refer to as "asymmetric". But to understand that, let's first learn about "symmetric" cryptography with the aid of an analogy.
To understand symmetric cryptography, imagine John has a box with a lock. As usual, the lock has a key that can lock and unlock the box. So, if John wants to protect something, he puts it in the box and locks it. Obviously, only he or someone else with a copy of his key can open the box. That’s symmetric cryptography: you have one key, and you use it both to encrypt (“lock”) and decrypt (“unlock”) your data.
Now let’s see how asymmetric, or “public-key” cryptography works. Imagine Anna has a box too. But this is a box with a very special lock. This lock has three states: A (locked), B (unlocked) and C (locked).

And it has two separate keys (yes, two). The first one can only turn clockwise (from A to B to C) and the second one can only turn anticlockwise (from C to B to A).
Anna picks the first key and keeps it for herself. We will call this key her “private” key, because only Anna has it -- and she will guard it with her life!
We will call the second key, her “public” key: Anna makes a hundred copies of it, and she gives some to friends and family, she leaves a bunch on her desk at the office, she hangs a couple outside her door, etc. If someone asks her for a business card, she hands him a copy of the key too.
So, Anna has her private key that can turn from A to B to C. And everyone else has her public-key that can turn from C to B to A. We can do some very interesting things with these keys.
First, imagine you want to send Anna a very personal document. You put the document in the box and use a copy of her public-key to lock it. Remember, Anna’s public-key only turns anticlockwise, so you turn it from position B to position A. Now the box is locked. The only key that can turn from A back to B is Anna’s private key, the one she kept for herself.
That’s it! This is what we call public-key encryption: Everyone who has Anna’s public-key (and it’s easy to find a copy of it, she’s been giving them away, remember?) can put documents in her box, lock it, and know that the only person who can unlock it is Anna.
There is one more interesting use of this box. Suppose Anna puts a document in it and then uses her private key to lock the box, i.e. she turns the key from position B to position C. But why would she do this? After all, anyone with her public-key can unlock it anyway! But wait...
Someone delivers this box to you and he says it’s from Anna. You don’t believe him, but you pick Anna’s public-key from the drawer where you keep all the public-keys of your friends, and try it out. You turn right... nothing. You turn left... and the box opens! This can only mean one thing: the box was locked using Anna’s private key, the one that only she has. You can now be certain that Anna, and no one else, put the documents in the box. This property of the public-private key pair enables us to treat Anna's act of locking the box as her “digital signature”.
What are SSH keys?
“Keys” are just numbers -- big, long numbers with many digits. When keys are stored on a device, they are usually expressed as a long sequence of characters, including both numeric and alphabetic characters -- but in the end this is just a special representation of a really huge number. You can save your private key in a text file on a device you control (a smartphone, laptop, PC, etc). On the other hand, you can make your public-key available in your email signature, on your website, any public forum, or leave a copy of it on any device owned or managed by anyone else. And there is no need for special boxes; communication flowing between you and someone else is just “locked” and “unlocked” using an appropriate program (e.g. an app on a smartphone, a program installed on your PC, etc) and one of the two keys (depending on the direction of the communication flow).
If anyone, even you, encrypts (i.e. “locks”) something with your public-key, only you can decrypt it (i.e. “unlock” it) with your secret, private key. If you encrypt (i.e. “lock”) something with your private key, anyone can decrypt it (i.e. “unlock” it), but this serves as a proof that you encrypted it: it’s “digitally signed” by you.
A given public-private key pair employed with a strong encryption scheme plays a pivotal role in (a) authentication ("I am who I claim to be, so give me access!") (b) confidentiality ("Nobody else can snoop in on what we're talking about.") and (c) integrity ("The information you received from me is intact in original form and untampered.").
Let's now see how we can create a pair of SSH keys (i.e. one private and one public) and use it to secure our connection to the HPC system.
Generating Keys on Linux & Mac OS X
The instructions below will only work either if you are in the TAMUQ building on an authorized network, or if you first connect to the TAMUQ network using VPN. Once you satisfy one of those conditions, you may proceed...
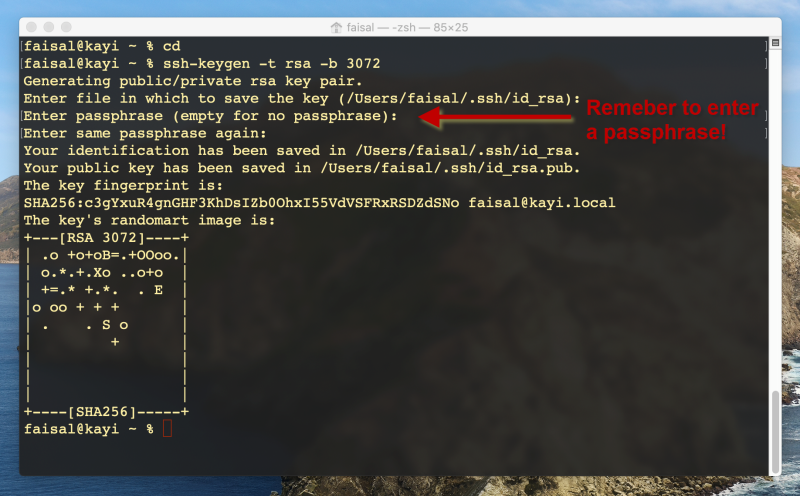
If you are on a Linux or Mac system, the procedure should be nearly identical. On a Linux system you will first need to launch a terminal application. If you are on a Linux system without any graphical interface (e.g. a desktop GUI), you are already within a terminal and ready to go. On a Mac system, you will want to search for and launch an application called "terminal". From here on, you will type the same commands at the command prompt within the respective terminal application:
cd
ssh-keygen -t rsa -b 3072
The first command positions you at the top level of your home directory. The second command starts the SSH key-pair generator program. The ssh-keygen program will prompt you for several inputs now:
- It will ask you to enter a filename in which to store the key pairs. Accept the default value by just hitting enter.
- You will now be prompted for a passphrase. Carefully select and enter a passphrase to protect your private key.
- You will be prompted to confirm the passphrase by entering it again.
- No more inputs will be requested, but several lines of information will be displayed. You may ignore these.
The passphrase you entered above functions like a password that is used to scramble the contents of your private key so that even if it were to land in the wrong hands, the attacker would not be able to use it without knowing the passphrase. Be sure to follow general best practices to come up with a strong passphrase.
The ssh-keygen program will have created two new files in your .ssh directory:
id_rsawill contain an encrypted copy of your private key. Anyone who gets a hold of this file, and has knowledge of your passphrase, will be able to log in to raad2 with your identity. Protect this key with your life!id_rsa.pubwill contain your public key. This can safely be shared with anybody and everybody.
Now that you've created your key pair, you will want to copy your public key file to the remote host and append its contents to the authorized_keys file in the .ssh subdirectory of your remote home directory. Here is how you can copy your public key to raad2:
cat ~/.ssh/id_rsa.pub | ssh your_username@raad2.qatar.tamu.edu 'cat >> ~/.ssh/authorized_keys'
...where you replace your_username with your raad2 account username (e.g. fachaud74) and where you enter your raad2 account password when prompted for it by ssh. Once this is done, you may test your ability to log in to the remote host as follows:
ssh your_username@raad2.qatar.tamu.edu
When you issue this command, you will be prompted for the passphrase that you used to protect your private key. Enter the passphrase to proceed to a successful login.
NOTE: Follow these instructions if you see the annoying locale warning as in the image above.
Keep in mind that you should only ever have to run ssh-keygen once on your local system (e.g. your personal laptop, your office desktop, etc). If you have previously followed the instructions above to set up your ssh connection and you then run ssh-keygen a second time on the same system, it will overwrite your previous public and private key files. This will break the key based login you set up the first time around. [ The fix would then be to append the new public key to the authorized_keys file on the remote host. ]
Caching the SSH Key Passphrase
To avoid having to enter your passphrase every time you use ssh, you can use the ssh-add and ssh-agent programs on your local host. Issue the two following commands in your terminal:
ssh-add (you will be prompted for the passphrase on your private key)
ssh-agent
You should now be able to use ssh to log in to the HPC system any number of times without having to enter the passphrase every time.
ssh your_username@raad2.qatar.tamu.edu
The ssh-agent program will remain active for as long as your desktop or laptop is up and running. If you reboot your desktop/laptop (or log out from your user account and then log back in), you will need to rerun the ssh-add and ssh-agent commands.
Generating Keys on Windows
There are multiple ways to generate SSH key pairs on a Windows system, and any method or tool will suffice for our needs as long as it is based on the SSH protocol. We present instructions for two popular tools that can help us to generate and use SSH keys and recommend MobaXterm as our preferred tool for its user friendliness. On rare occasions a user may have to rely on PuTTY instead, so those instructions are offered as well.
The instructions below will only work either if you are in the TAMUQ building on an authorized network, or if you first connect to the TAMUQ network using VPN. Once you satisfy one of those conditions, you may proceed...
Generating Keys with MobaXterm
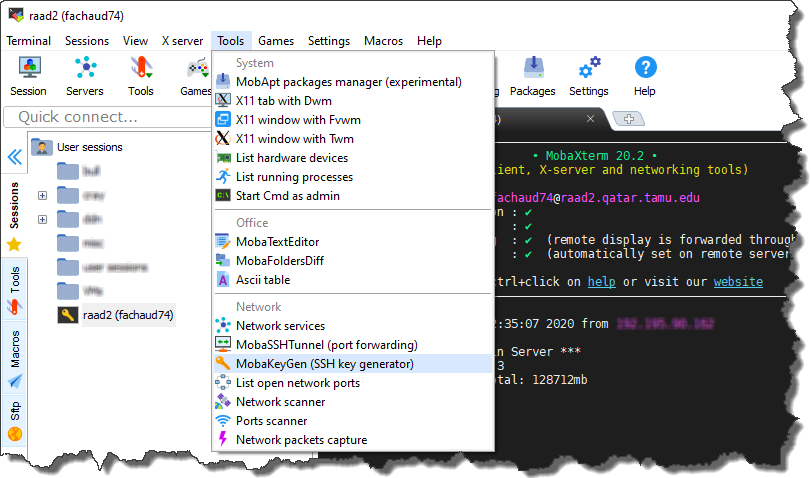
For instructions on how to install and configure the MobaXterm ssh client on your Windows system, please follow these instructions. The MobaXterm application includes a tool to help you generate ssh key pairs. Before starting, you should login to raad2 in MobaXterm using your account username and password. Once you are logged in:
- Click on “Tools -> MobaKeyGen”
- You should then see the “MobaXterm SSH Key Generator” screen.
- Click on “Generate”, and you will be prompted to move the mouse around to generate random data. Move your mouse until the green bar fills up.
- Once the green bar fills up, you should see a populated screen.
- (optional) Although the "Key comment" field is optional, we recommend you replace the default value in this field with a more useful description of the connection for which you will use this key pair.
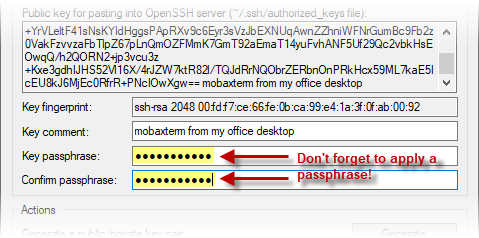
- For security purposes, you must protect your private key with a password. To do so, carefully select and enter a password in the “Key passphrase” and “Confirm passphrase” fields (following general best practices for password creation).
- Next, click “Save private key” and save the key to a known location on your local laptop/desktop (we recommend your “Documents\MobaXterm\home\.ssh" directory). Assign any name you like to the private key file. Also save a copy of the public key to the same directory (the "Save public key" button) but append "-public" to the name of the key file just so it is different than the name of the private key file.
- At the top of the window you’ll see the text contents of your public key. Select this text in its entirety with your mouse, making sure to scroll all the way to the bottom of the text box. NOTE: For copy-paste functionality in MobaXterm, do NOT use the ctrl-C and ctrl-V keyboard shortcuts. Instead, select and highlight the text you need to copy, then use the right mouse button to bring up a context menu and select "Copy" (and likewise, select "Paste" from this context menu later on when you are about to paste the value somewhere).
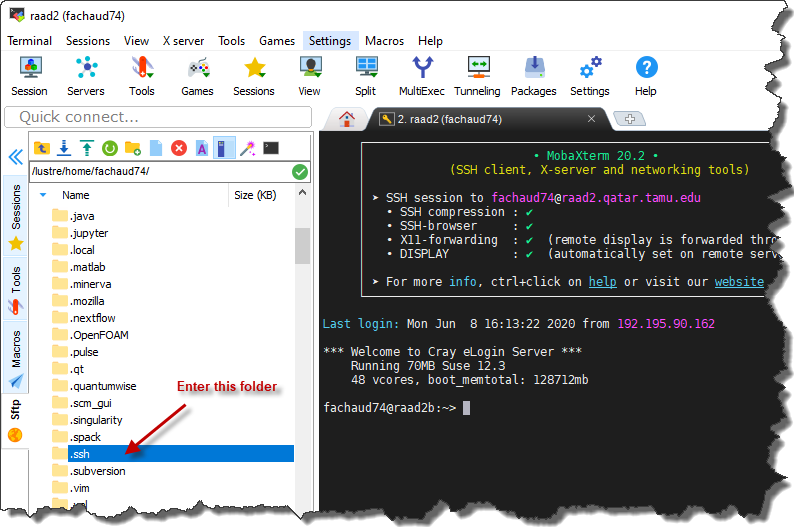
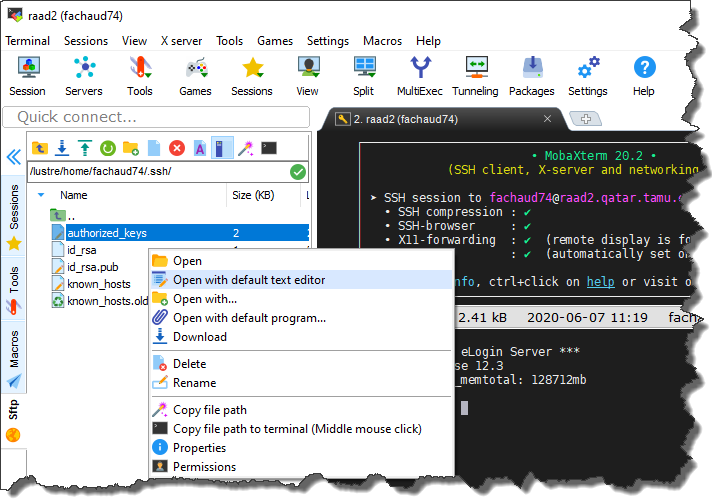
- Now, go back to the tab where your raad2 ssh session is running. Use the file navigator to the left of the terminal pane to go into the ".ssh" folder.
- Within the .ssh directory, you should see a file named “authorized_keys”. Right-click on this file and select the "Open with default text editor" option from the context menu.
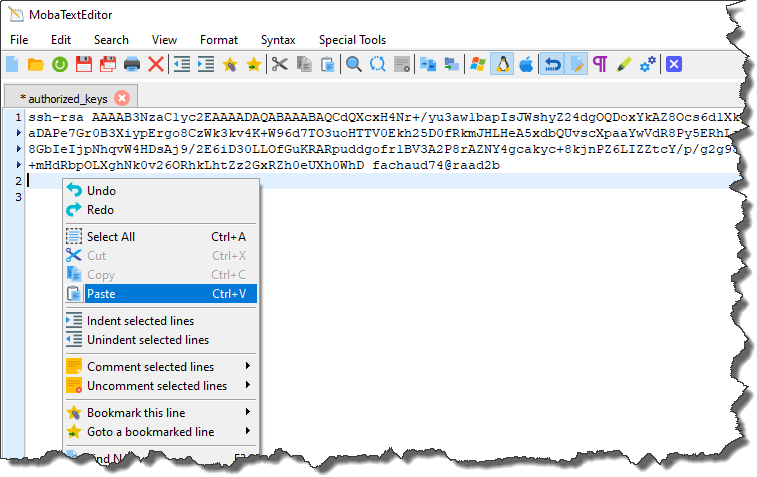
- At least one key will likely already be present in this file. Position the cursor at the line following the last key present, then right click the mouse and select "Paste" from the context menu.
- This will paste the public key that you copied into the clipboard earlier from the MobaKeyGen tool. Save the “authorized_keys” file when you are done (use the "File -> Save" menu item within the editor).
Caching MobaXterm Key Passphrase
We now need to complete a few more steps to enable MobaXterm to cache the passphrase protecting your private key so that it needs to be entered only once, instead of every time you start a new login session.
- First go to “Settings->Configuration” and go to the “General” tab and click on “MobaXterm passwords management”
- Establish a MobaXterm master password so that any secrets (passwords, passphrases, etc) you ask it to remember are well protected with encryption before being written to disk. To do this, click on the "Master Password settings" button.
- In the resulting window, carefully select and enter a password following general best practices. Be sure to remember this password, as it cannot be recovered if you forget it. Also, in the section entitled "Prompt me for my master password" we recommend you select the "at every MobaXterm startup" option so that it forces you to supply the master password occasionally (and hence to more easily remember it). Click OK.
- Back in the "MobaXterm passwords settings" window, at the top of the window where it says “Save sessions passwords”, select “Ask”. Also be sure to check the “Save SSH keys passphrases as well” checkbox. Then click “OK”.
- In the “MobaXterm Configuration" window go to the “SSH” tab, and at the bottom of the screen check the “Use internal SSH agent “MobAgent”” checkbox.
- Just below this checkbox, click the “+” sign to the the right of the “Load following keys...” area, and navigate to the #location of your private key file, and select it.
- Then click OK. You will be prompted to restart Mobaxterm. Go ahead and restart it.
- When MobaXterm restarts, you will be prompted to enter the passphrase for your private key.
The final step will be to add your key to the raad2 session in the MobaXerm application.
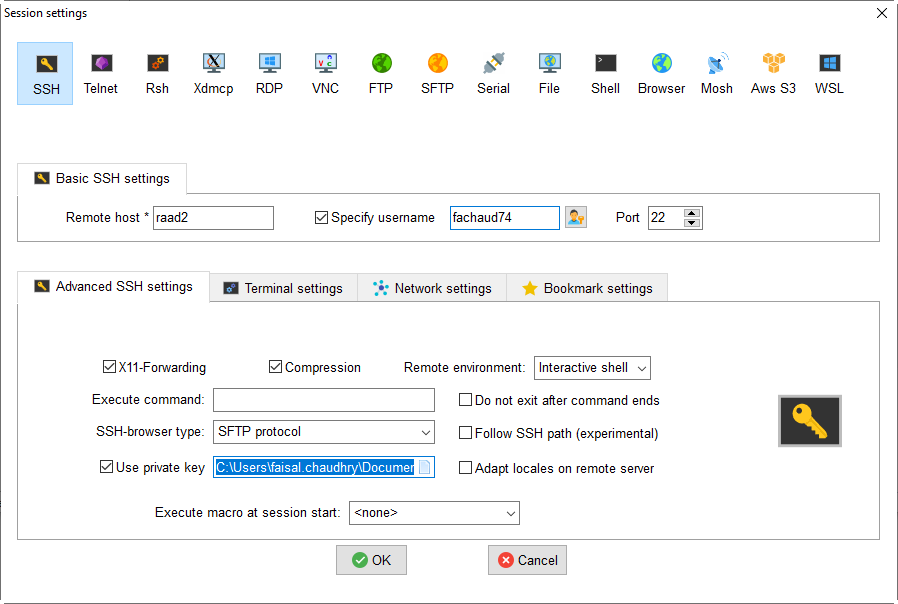
- On the left pane of MobaXterm, you should see a list of saved “User sessions”, including a session for “raad2” that you would have created previously. Right-click on the “raad2” session, and select “Edit session” from the context menu.
- Select the “Use private key” checkbox. The field next to the checkbox should populate with a path to your local private key. If it does not, or it is not the correct path, then click the blue icon on the right end of the field and navigate to the location of your private key file.
- Click OK to save your changes.
- Now, in the left pane of saved user sessions, you should be able to double click on the “raad2” session, and a new tab should open up, and log you into raad2 without you having to enter either your account password or the passphrase protecting your private key.
- Once you have verified that you can login, exit from all of your SSH sessions and close the MobaXterm application.
- As a final check, re-launch the MobaXterm application. It should ask you for your MobaXterm master password. After entering the correct value, double click on the saved “raad2” session. As before, a new tab should open up and log you in to raad2 without you having to enter anything. As long as you keep this instance of MobaXterm up and running, you will be able to log in to raad2 without having to supply any input.
Generating Keys With Putty
- Under Construction!
Caching Putty Key Passphrase
- Under Construction!
